Managing and Using Modules
Learn how to explore, create, interact with, configure, and manage Modules in Genbase Studio.
Managing and Using Modules
Modules are the heart of Genbase – they are the running instances of Kits that perform tasks. This guide covers how to manage and interact with Modules using the Genbase Studio interface.
1. Exploring Modules
The Module Explorer, typically located in the left sidebar when the "Modules" navigation tab is active, displays all Modules within the currently selected Project.

(Image: Screenshot of the Module Explorer tree view, showing folders and module instances.)
- Navigation: Modules are organized hierarchically based on their Path. Click folders (represented by chevrons) to expand or collapse them.
- Selection: Click directly on a Module's name (next to the box icon ) to select it. The Main Content Area and Bottom Panel will update to reflect the selected Module.
- Search: Use the search bar above the tree to filter Modules by name or path.
2. Creating a New Module
You instantiate Kits to create runnable Modules within your active Project.
- Open Dialog: Click the "Create Module" button usually found at the top of the Module Explorer, or potentially via a context menu on a folder.
- Select Kit & Version: Choose the base Kit and the specific version you want to instantiate from the dropdown list. This list shows Kits installed locally in your Genbase environment (you might need to install Kits from the Registry first).
- Name Your Module: Provide a clear, descriptive
module_name. This is how the Module will appear in the UI. - Set Module Path (Optional): Define the hierarchical path (
segment1.segment2) where this Module should reside within the Project structure. If left blank, a default path might be assigned. Ensure the path uses only letters, numbers, and dots. - Configure Environment Variables: If the selected Kit defines required or optional environment variables, input fields will appear. Provide necessary values. Defaults might be pre-filled.
- Confirm Creation: Click the "Create" button.

(Image: Screenshot of the "Create Module" dialog showing Kit selection, name, path, and environment variable inputs.)
Genbase will initialize the Module, create its dedicated Workspace (Git repository) based on the Kit's workspace content, and set its initial state. The new Module will appear in the Explorer tree.
3. Interacting via Chat & Profiles
The primary way to interact with a Module's capabilities is through its Profiles using the chat interface in the Bottom Panel.
 (Image: Screenshot of the Bottom Panel showing Profile tabs, Session tabs, the chat message history area, and the input box.)
- Select Module: Click the desired Module in the Module Explorer.
- Select Profile: The Bottom Panel will show tabs for the Profiles defined by the Module's Kit (e.g.,
initialize,maintain,edit). Click the tab corresponding to the task you want to perform. - Select/Start Session:
- If the Profile allows multiple sessions (
allow_multiple: true), you'll see session tabs (often showing timestamps or the last message). Click a tab to resume a session. - Click the "+" or "New Session" tab/button to start a fresh conversation within that Profile.
- If
allow_multiple: false, you'll likely just have the default session.
- If the Profile allows multiple sessions (
- Send Messages: Type your request or instruction into the input box at the bottom and press Enter (or click the Send button).
- View Responses: The Agent's responses will appear in the chat history area. This can include:
- Text: Formatted text, potentially using Markdown.
- Tool Calls: Indications that the agent executed an Tool (often collapsible to view parameters).
- Tool Results: The output returned by an Tool (often collapsible).
- Generative Elements: Rich content like Mermaid diagrams or sandboxed HTML rendered directly in the chat.
- Continue Conversation: Respond to the agent's messages or provide further instructions. The chat history is maintained per session.
Agent Interaction
Remember you are interacting with an Agent specific to the selected Profile. Its capabilities and context are defined by the Kit and the Profile configuration. Refer to the Profile details (often accessible via an info button near the Profile selector) to understand its purpose and available Tools.
4. Managing the Workspace
When a Module is selected, the Main Content Area often defaults to showing its Workspace.
 (Image: Screenshot of the Main Content area showing the file tree for the 'workspace' resource type and the code editor/preview pane.)
- Resource Type: Ensure "workspace" is selected in the dropdown (usually near the top of the Main Content area) to view the Module's repository files.
- File Tree: Navigate the Module's file structure on the left side of the Main Content area. Click files to view their content.
- Content Viewer: The right pane displays the content of the selected file.
- Code Editor: For most file types, a code editor (like Monaco) is shown for viewing. (Note: Direct editing and saving capabilities might depend on the specific Genbase Studio version and configuration. The underlying API supports file updates.)
- Markdown Preview: For Markdown files (
.md), toggle buttons (, ) usually allow switching between the raw code view and a rendered preview.
- Refreshing: Use the Refresh button () to reload the file tree and content, reflecting any changes made by Tools.
5. Managing Resource Sharing (Provide)
Modules can share resources (WORKSPACE or TOOL) with each other using the Provide mechanism. You manage these provisions via the Provide Sidebar, which can usually be toggled open on the right side of the Main Content area.
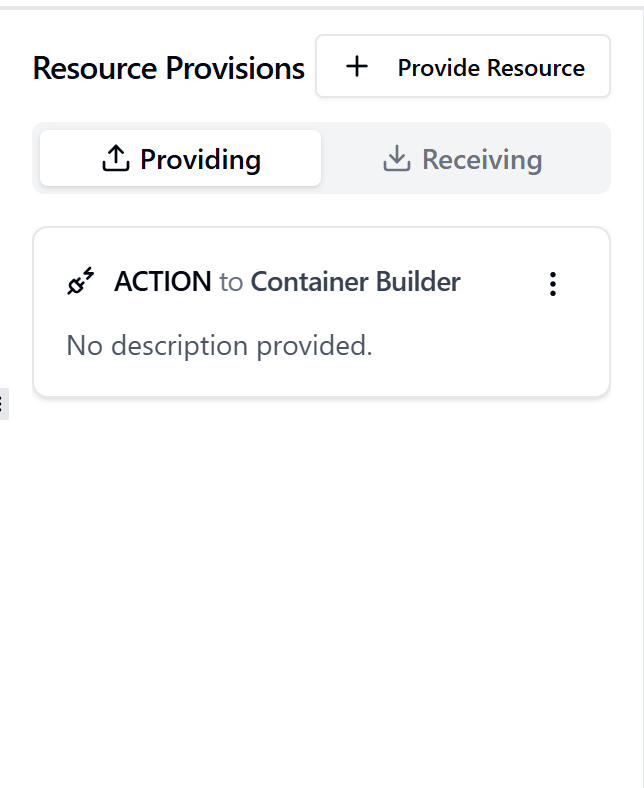
(Image: Screenshot of the right-hand sidebar showing "Providing" and "Receiving" tabs with cards representing resource provisions.)
- Toggle Sidebar: Click the "Provide" or "Relationships" button (often with a icon) usually located in the header of the Main Content area.
- View Provisions:
- Providing Tab: Shows resources this Module is granting access to other Modules.
- Receiving Tab: Shows resources this Module has been granted access from other Modules.
- Each card typically shows the resource type (Workspace/Tool), the target/source module, and a description.
- Add Provision:
- Click the "Provide Resource" or "+" button within the sidebar.
- A dialog appears (Screenshot).
- Select the Resource Type (
WORKSPACEorTOOL) you want to share from the current module. - (Optional) Add a Description explaining the purpose of this provision.
- Select the Target Module (the Receiver) from the list of available modules in the current project.
- Confirm the tool.
- Edit/Remove Provision (Providing Tab):
- Find the provision card under the "Providing" tab.
- Click the options menu (e.g., ) on the card.
- You can typically Edit Description or Remove the provision entirely. Removing a
WORKSPACEprovision will also attempt to remove the corresponding Git submodule from the receiver's workspace.
6. Module Settings & Deletion
You can view and manage specific settings for the selected Module.
-
Access Settings: Click the Info icon () often located near the Module's name in the Main Content header.
-
View Information: A dialog or tabbed view appears showing:
- Module Info: ID, Name, Kit origin (ID, Owner, Version), Path, Creation date.
- Kit Info: Details about the underlying Kit.
- Environment Variables: View currently set variables.
- Destroy/Danger Zone: Options for deleting the module.
 (Image: Screenshot of the Module Information dialog showing various tabs like Info, Env Vars, Destroy.)
 -
Manage Environment Variables:
- Navigate to the "Environment" tab/section.
- View: See existing key-value pairs.
- Edit: Click an "Edit" button next to a variable to change its value. Save the changes.
- Add: Click "Add Variable". You might be able to select from variables defined in the Kit (
kit.yaml'senvironmentsection) or add custom ones. Enter the name and value, then save.
 (Image: Screenshot showing the Environment Variable management UI with options to view, edit, and add variables.)
 -
Delete Module (Danger Zone):
- Navigate to the "Destroy" or "Danger Zone" tab.
- Read the warnings carefully. Deleting a module is irreversible.
- Click the "Force Delete Module" button.
- A confirmation dialog will appear, often requiring you to type the module's name to confirm.
 (Image: Screenshot of the confirmation dialog for deleting a module, emphasizing the destructive nature.)
Warning: Deletion is Permanent
Deleting a module removes its workspace repository, all chat history, stored state, and database records permanently. Associated resource provisions will also be affected. Proceed with extreme caution.
This guide covers the core functionalities for working with Modules in Genbase Studio. Refer to the specific concept pages for deeper understanding of the underlying mechanisms.